The main reason that a users profile, in most cases a domain profile, would appear in User Profile manager with the title of “Account Unknown” is because it’s SID (security ID) is invalid, or that the computer has otherwise joined a different domain. Depending on the user, this “missing” profile could mean the difference between life or death, in regards to files, settings, etc.
These steps will guide you through recovering these profiles back to a state where they can be copied over a new profile, or even to the point where you can log back into the same profile.
- Access the User profile folder and determine which folder is the “true” folder you wish to recover.The funny thing with Windows operating systems is that, although you may log in as the same user under the same domain, if your profile encounters some problem, then a new folder is created with almost the same name, but can have “.001”, etc added to the end.The best way to determine the correct folder, is to try checking the date on some of the files, and even seeing the folder size of the profile. The bigger it is, the more likely that is the one you want to use.
- Log in as the correct users.
At this point, you have probably logged in as the under your username, and have had a new profile directory created within the User profile folder. You can check the dates on the folders for the creation date to see which one is the new one.Once you have determined which folder is for the “true” profile, and which one is the newly created one, you must log in as another user (preferably as an Administrator, since that user has all rights to all folders on the PC) so you can begin the recovery process. - Using the registry editor
Now comes the hard part: you must open the Registry Editor and navigate to:HKEY_LOCAL_MACHINE\SOFTWARE\Microsoft\Windows NT\CurrentVersion\ProfileList
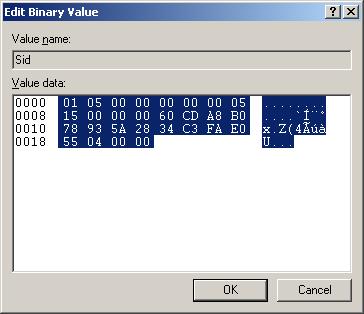
Within this key you will find several keys (the keys are the items on the left side of the registry editor), and the ones you will be navigating through will begin with S-1-5-21. This is to signify a user, with every number afterwards being specific to each user.Now, you will have to search through each one of these keys, and look at the ProfileImagePath value (the values are the items on the right side of the registry editor). This is reveal the paths for each profile, one key of which will be the profile you are trying to resurrect, and one key of which will be the new profile that was created.When you find the key of the new profile, double-click the Sid value to reveal the following:
This is your user SID, and each one is specific to each user, kind of like fingerprints, DNA, etc. You will need to highlight the numbers in the middle as shown above, then copy.
Now, go back to key for the “dead” profile, and open the Sid key here. Highlight the numbers in the middle here as well, then paste them over the top. Now, both the old key and the new key should have identical Sid values.
At this point, you should congratulate yourself, as you have completed the hardest part of the resurrection process!
- Copy the profile.
After completing the steps in the Registry, now open your User Profile list, and you should have 2 identical entries. The differentiating factor here will be the size of each profile, as the old one will be large than the new.At this point you have several options:
– You can delete the new profile, and log in under the old one. You can do this at your own risk, because sometimes it will just recreate the new profile, and you will have to do the second option, which is:
– Copy the old profile over the new profile. You’ll use the Copy To button while highlighting the “old” profile, then specify the folder on disk for the new profile. This will ensure that you can still use your old profile, with all of its settings and files, under the new profile’s directory. - See the dead come to life!
Once you’ve removed or copy your profiles, log off then log in as the user. Everything should be the same as before, and you’re ready to get back to work!
Since the original writing of this over 10 years ago, the process has gotten MUCH easier, and I actually prefer to use the FREE ForensIT User Profile Wizard tool. It gives you a nice wizard and makes the process a little more intuitive. I highly recommend it!


Resurrecting “Account Unknown” Profiles from the Dead!
This is all awesome info, however I’m stuck on the copy part that tells me “Failed to set security on the Destination Profile. Error – Access is denied.”
I’m using an Administrator account to move the old one (3.41GB – can’t ) into a new one with no success.
Could you please please help me further?
Alice
Hi Alice,
When I’ve typically seen the error “Access is Denied”, I usually either (1) need to reboot the PC to remove any locks on permission, or (2) ensuring that the user running the script has permission to reset ACLs on “ALL” files.
Since I’ve written this article, a great utility called User Profile Wizard has come out to help in aiding with the migration. You might want to try that one as well!
Link:
Chris
What does copy the old profile over the new one mean? Can you explain how to do that?
Hi Alex, This would be using the Copy To button under System / Advanced / User Profiles. I’ve expounded on this further in the post. Thanks for the question!