

I don’t take the term “journey” lightly because now a month in I’m edging closer and closer to the finish but I still feel like I have a long way to go. From lots of reading and even some advise to “abandon the idea”, I’m not one to be a quitter
Thought I’d decide to give it a shot, but definitely fell short with the Microsoft documentation given all of the intricacies of the deployment:
Thanks to Sandy’s blog post I certainly got closer, even took the effort to build out an deployment Powershell script (which you can find here on my GitHub), and the server side portions are definitely getting further than ever. My final steps are shoring up the Intune policy in my lab and then the Windows 10 printer setup (which I hear is the final hurdle to the mountain top)
But when I took the script to run in my client’s production environment, I was missing files in the MophiaPrint folder in the inetpub\wwwroot directory, as well as the EnterpriseCloudPrint virtual directory:

But in my lab:

See? Both the EnterpriseCloudPrint and MopriaCloudService are there, which is evident by the EnterpriseCloudPrint virtual directory
Of course my first thing to do was crack open the Powershell script for installation
cd ‘C:\Program Files\WindowsPowerShell\Modules\PublishCloudPrinter\1.0.0.0’
notepad .\CloudPrintDeploy.ps1
Then I looked at the lines of code
Write-Output “** Deploying Enterprise Cloud Print binaries”
“** Installing Enterprise Cloud Print binaries” | Out-File $LogFile -append
dism /online /Add-Capability /CapabilityName:Print.EnterpriseCloudPrint~~~~0.0.1.0 >> $LogFile
Write-Output “** Deploying Mopria Discovery Service binaries”
“** Installing Mopria Discovery Service binaries” | Out-File $LogFile -append
dism /online /Add-Capability /CapabilityName:Print.MopriaCloudService~~~~0.0.1.0 >> $LogFile
In said CloudPrintDeploy.log
** Installing Enterprise Cloud Print binaries
Deployment Image Servicing and Management tool
Version: 10.0.14393.0Image Version: 10.0.14393.2457
Error: 87
No Windows features were specified on the command line.
Use the /Get-Features option to find the name of the feature in the image and try the command again.The DISM log file can be found at C:\Windows\Logs\DISM\dism.log
** Installing Mopria Discovery Service binariesDeployment Image Servicing and Management tool
Version: 10.0.14393.0Image Version: 10.0.14393.2457
Error: 87
No Windows features were specified on the command line.
Use the /Get-Features option to find the name of the feature in the image and try the command again.
So I try to run the dism command outside of Powershell. Duh, same result.
So I found the command DISM /online /get-capabilities to see what capabilities were available for this build on the client server
DISM /online /get-capabilities
Deployment Image Servicing and Management tool
Version: 10.0.14393.0Image Version: 10.0.14393.2457
Capability listing:
Capability Identity : Language.Basic~~~en-GB~0.0.1.0
State : InstalledCapability Identity : Language.Basic~~~en-US~0.0.1.0
State : InstalledCapability Identity : Language.Handwriting~~~en-US~0.0.1.0
State : InstalledCapability Identity : Language.OCR~~~en-US~0.0.1.0
State : InstalledCapability Identity : Language.Speech~~~en-US~0.0.1.0
State : InstalledCapability Identity : Language.TextToSpeech~~~en-US~0.0.1.0
State : Installed
But when I go to run the same on my regular 14393 build, I get a TON more features….
PS C:\Windows\system32> DISM /online /get-capabilities
Deployment Image Servicing and Management tool
Version: 10.0.14393.0Image Version: 10.0.14393.0
Capability listing:
Ill Save you the hassle of all the language packs and get to the meat of it:
Capability Identity : Language.Handwriting~~~en-US~0.0.1.0
State : InstalledCapability Identity : Language.OCR~~~en-US~0.0.1.0
State : InstalledCapability Identity : Language.Speech~~~en-US~0.0.1.0
State : InstalledCapability Identity : Language.TextToSpeech~~~en-US~0.0.1.0
State : InstalledCapability Identity : Print.EnterpriseCloudPrint~~~~0.0.1.0
State : InstalledCapability Identity : Print.MopriaCloudService~~~~0.0.1.0
State : Installed
After working with the client, turns out if you’re using WSUS or SCCM, and do not have the feature packs enabled, it can cause the features to not be found. This blog from Stephen Wagner helps point out a work around:
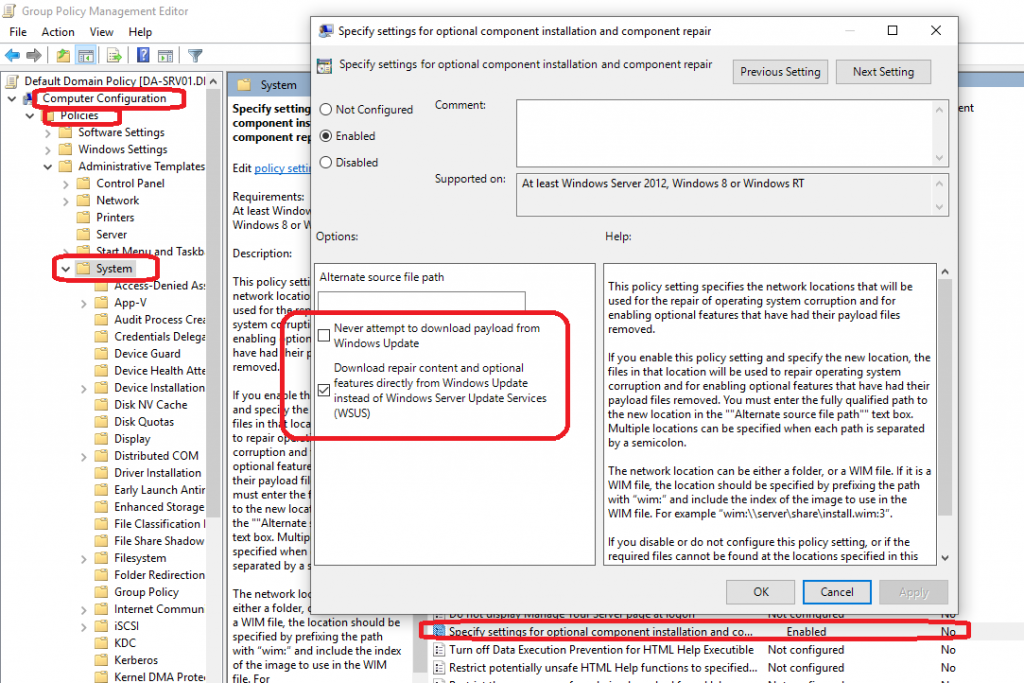
Enable download of “Optional features” directly from Windows Update
- Open the group policy editor on your domain
and create a new GPO scoped to the server in question, OR open secpol.msc on your server to modify the settings locally - Navigate to “Computer Configuration”, “Policies”, “Administrative Templates”, and then “System”.
- Double click or open “Specify settings for optional component installation and component repair”
- Make sure “Never attempt to download payload from Windows Update” is NOT checked
- Make sure “Download repair content and optional features directly from Windows Update instead of Windows Server Update Services (WSUS)” IS checked.
- Wait for your GPO to update, or run “gpupdate /force” on the machine.
Quick way to fix this issue:
https://answers.microsoft.com/en-us/windows/forum/all/issues-to-installrun-rsat-tools-on-windows-10-1903/47a459b0-d49b-4f28-9069-8a0519644f39
On the next group policy update, the change will be reverted.